TL;DR: Most pocket knives sharpen best at 17-22 degrees per side using a whetstone progression from 1000 to 6000 grit. Budget setups start at $18-25 for combination stones, while proper technique matters more than expensive equipment. Expect 15-25 minutes per sharpening session once you've learned burr detection and angle consistency.
What Tools Do You Need to Sharpen a Pocket Knife?
You need three essentials: a whetstone (1000-6000 grit range), water or honing oil, and a consistent angle. Everything else is optional but helpful.
According to URBAN EDC, "Edge retention and maintenance are vital. When a knife is dull, we usually find ourselves overcompensating with increased pressure, which can actually be quite dangerous." That pressure compensation is exactly why learning proper sharpening technique matters – it's a safety issue, not just about performance.
Here's your budget breakdown:
Budget Setup ($18-30):
- Combination whetstone (1000/6000 grit): $18-25
- Spray bottle for water: $3-5
- Total: $21-30
Mid-Range Setup ($50-75):
- Separate 1000 grit stone: $25-30
- 6000 grit finishing stone: $30-35
- Leather strop: $15-20
- Total: $70-85
Premium Setup ($150+):
- Professional stone set (400/1000/3000/6000): $120-140
- Quality leather strop: $35-45
- Angle guide: $10-15
- Total: $165-200
The grit numbers tell you particle density – higher numbers mean finer abrasive. Sylva Spoon breaks down the ranges: "120-320: very coarse, best used for repairing heavy damage or for changing a bevel angle," while "1000-2000: good starting grit for general sharpening, should use a finer grit after these."
For most pocket knife owners, the budget combination stone works perfectly. You're not sharpening professionally – you just need your EDC blade cutting cleanly again.
Key Takeaway: A $25 combination stone (1000/6000 grit) handles 90% of pocket knife sharpening needs. Premium stones offer consistency advantages but won't make you sharper faster than proper technique on budget equipment.
How to Sharpen a Pocket Knife with a Whetstone
Whetstone sharpening follows a simple pattern: soak the stone, establish your angle, sharpen until you feel a burr, then progress through finer grits. The entire process takes 15-25 minutes once you've practiced a few times.
Start by soaking your water stone for 10-15 minutes if it's a traditional Japanese-style stone. Diamond plates work dry or with a light water spray – no soaking needed.
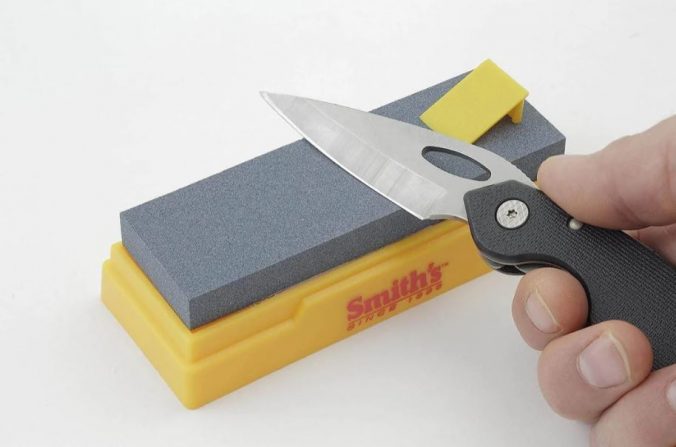
Step 1: Lock the blade open and find your angle. Palmetto Wood Shop recommends: "Hold the knife at about a 15-20° angle, depending on its original bevel." Most pocket knives sit in that sweet spot, though we'll get specific about angles in the next section.
Step 2: Start with your coarsest stone (1000 grit for maintenance, 400 grit for damaged blades). Place the blade against the stone at your chosen angle. Use moderate pressure – about the weight of the knife plus light hand pressure.
Step 3: Push the blade across the stone in smooth strokes. Buck Knives advises: "Always cut into the stone, never drag your knife edge back over the stone and always maintain your angle." Draw the blade from heel to tip in one continuous motion.
Step 4: Count your strokes and alternate sides. Do 5-10 strokes on one side, then switch. Buck Knives recommends: "We recommend doing 5 strokes per side and then evaluating the grind you are creating."
Step 5: Check for burr formation. Lightly drag your fingertip perpendicular across the edge (from spine to edge, not along it). You should feel a tiny wire of metal catching on the opposite side from where you've been sharpening. This burr tells you you've reached the apex and created a new edge.
Step 6: Progress through finer grits. Once you've formed a burr at 1000 grit, move to 3000, then 6000. Each finer grit removes the scratches from the previous one and refines the edge. Wicked Edge suggests: "Do about 15 alternating, edge-leading passes per grit."
Step 7: Remove the burr on your finishing stone. Use very light pressure – just the weight of the blade – and alternate single strokes side to side until the wire edge breaks away cleanly.
What Angle Should You Hold the Blade?
The right angle depends on your blade steel and how you use the knife. According to URBAN EDC, "Most pocket knives perform best with an edge angle of 17-22 degrees on each side."
Here's how to choose:
For everyday carry (opening boxes, cutting cordage): 20 degrees per side gives you the best balance. Palmetto Wood Shop confirms: "For a Balance of Sharpness & Durability: Sharpen at 20°."
For maximum sharpness (detail work, food prep): 15-17 degrees creates a keener edge. Palmetto Wood Shop notes: "For Sharpness: Sharpen at lower angles like 15-20°."
For heavy-duty use (camping, construction): 22-25 degrees provides durability. Palmetto Wood Shop explains: "For Durability: Sharpen at higher angles like 20-25°."
Buck Knives sharpens their factory edges to "13-16 degrees per side," but that's with professional equipment and premium steels. For home sharpening, Popular Mechanics advises: "sharpen everything at 20 degrees. Your average person will not notice a difference between 20 and 15 degrees."
The coin trick helps you visualize 15 degrees: stack two quarters under the spine of your blade when it's flat on the stone. That gives you roughly 15 degrees. Three quarters gets you closer to 20 degrees.
How Many Strokes Does Each Side Need?
Stroke count depends on how dull your blade is and what grit you're using. For light maintenance on a blade that's just lost its edge, 20-30 strokes per side at 1000 grit usually does it. For a genuinely dull blade, expect 40-50 strokes before you feel that burr form.
The burr is your signal to stop and move to the next grit. Wicked Edge recommends: "Do 10 edge-leading strokes on one side and check the other for a burr."
Don't just count blindly – check your progress. After every 10 strokes, feel for the burr. Once it forms along the entire edge length from heel to tip, you're done with that grit. Moving to finer stones, you'll need fewer strokes – typically 15-20 alternating passes per grit level.
Buck Knives notes: "It should take at most 5-8 strokes to resharpen if your angle was correct." That's for touch-ups on blades that are barely dull. If you're fixing actual damage or establishing a new bevel, plan on significantly more.
Test sharpness between sessions by slicing printer paper held vertically. A sharp edge cuts cleanly without tearing or requiring forward pushing motion – just the blade's weight slices through.
Key Takeaway: Form a burr at 1000 grit (20-50 strokes depending on dullness), then progress through 3000 and 6000 grits with 15-20 alternating passes each. The burr – not a stroke count – tells you when to advance.
How to Use a Honing Rod on a Pocket Knife
A honing rod realigns your edge between full sharpenings – it doesn't actually sharpen. Think of it as straightening the microscopic teeth that bend during use rather than grinding away metal to create a new edge.
Here's the five-step process:
Step 1: Choose the right rod. Smooth steel rods only realign. Ceramic or diamond-coated rods do light sharpening. For pocket knives, a ceramic rod works well for weekly maintenance.
Step 2: Stabilize the rod. Hold it vertically with the tip resting on a folded towel for stability. This gives you better control than trying to hold it in the air.
Step 3: Match your sharpening angle. If you sharpen at 20 degrees, hone at 20 degrees. Consistency matters here just like it does on the stone.
Step 4: Draw the blade down the rod. Start with the heel of the blade at the top of the rod. Sweep down and across in one smooth motion, ending with the tip of the blade at the bottom of the rod. Light pressure – you're realigning, not grinding.
Step 5: Alternate sides. Five to ten passes per side is typical for pocket knives. You'll feel cutting performance improve immediately if the edge just needed realignment.
When should you hone versus sharpen? Palmetto Wood Shop suggests: "pocket knives should be sharpened monthly or whenever the blade is no longer cutting as efficiently as before." Between those monthly sharpenings, hone weekly if you use your knife daily.
When honing stops restoring performance, it's time to return to the stones. The edge has worn beyond what realignment can fix – you need to remove material and create a fresh apex.
Key Takeaway: Hone weekly with 5-10 passes per side at your sharpening angle to extend time between stone sessions. When honing no longer restores cutting performance, return to whetstones for actual sharpening.
Stropping: The Final Step for Razor-Sharp Edges
Stropping polishes your edge beyond what finishing stones achieve and removes microscopic burr fragments. It's the difference between sharp and scary-sharp.
You don't need expensive equipment. A leather belt from a thrift store works perfectly. Cut a 2-3 inch wide strip, glue it smooth-side-up to a piece of scrap wood, and you've got a functional strop for under $5. Add $8 for chromium oxide compound (the green stuff) and you're set.
How to strop:
Step 1: Load your strop with compound. Rub the chromium oxide stick across the leather surface. You want a thin, even coating – not globs.
Step 2: Strop spine-first. This is critical and feels backward at first. Pull the knife across the leather with the spine leading and the edge trailing. If you push edge-first, you'll cut into the leather and damage your edge.
Step 3: Use very light pressure. Just the weight of the blade. You're polishing, not grinding.
Step 4: Alternate sides. Fifteen to twenty passes per side is typical for pocket knives. You'll see the edge take on a mirror polish.
The difference is noticeable. Before stropping, your 6000-grit edge slices paper cleanly. After stropping with compound, it glides through with zero resistance. For EDC tasks, this level of refinement is overkill – but it's satisfying and extends the time before your next sharpening session.
Commercial strops run $25-45. DIY versions perform identically if you use quality leather. The compound matters more than the strop itself.
Key Takeaway: Stropping with chromium oxide compound (0.5 micron) on leather refines edges beyond 6000 grit stones. DIY strops from leather belts cost under $10 versus $35+ for commercial versions with identical results.
Common Sharpening Mistakes and How to Fix Them
Most beginner failures come down to five errors: inconsistent angles, uneven pressure, not recognizing the burr, over-sharpening, and wrong grit progression.
Mistake 1: Angle wobble. If your angle varies by even 3 degrees during strokes, you create an uneven edge that dulls quickly. The fix: Use the Sharpie trick. Color your bevel with a permanent marker before sharpening. After 3-5 strokes, check the wear pattern. Marker removed only at the edge means too steep. Removed only at the spine means too shallow. Even removal means you've nailed the angle.
Mistake 2: Uneven side-to-side work. Most people do more strokes on their dominant-hand side without realizing it. This creates bevels of different widths. The fix: Count your strokes carefully and match them exactly. If you do 10 on the right, do exactly 10 on the left. Wicked Edge recommends: "Do about 15 alternating, edge-leading passes per grit" to prevent this.
Mistake 3: Not recognizing burr formation. You keep sharpening because you're not sure if you're done, thinning the edge excessively. The fix: Check for the burr every 10 strokes. Drag your fingertip lightly across (perpendicular to) the edge. That tiny wire of metal catching is your signal to stop and move to the next grit.
Mistake 4: Starting with too fine a grit. Sylva Spoon notes that "with grits above 2000 or so it can be difficult to feel the burr." If your knife is actually dull, starting at 6000 grit means you'll sharpen for an hour and get nowhere. The fix: Match your starting grit to blade condition. Damaged blade? Start at 400. Dull from use? Start at 1000. Just needs a touch-up? 3000 works.
Mistake 5: Excessive pressure. Pushing hard doesn't sharpen faster – it creates uneven spots and can damage your stone. The fix: Use moderate, consistent pressure. About the weight of the knife plus light hand pressure. Let the abrasive do the work.
How to fix uneven bevels from previous bad sharpening: If one bevel is visibly wider than the other (over 1mm difference), you'll need patience. Use the Sharpie method to see exactly where you're making contact. Do careful, counted strokes on the narrow side until the bevels match. This might take 100+ strokes at 1000 grit. For severe unevenness, consider professional regrinding – it's $15-35 and saves you hours of frustration.
Recognizing over-sharpening damage: If your edge chips or rolls immediately after sharpening, you've over-thinned the apex. The edge looks polished but fails under pressure. Prevention: Stop sharpening each side as soon as you feel the burr. More strokes don't make it sharper – they make it weaker.
Key Takeaway: Use the Sharpie trick to verify angle consistency, count strokes to prevent uneven bevels, and stop sharpening each grit level as soon as you feel a burr along the entire edge. These three habits prevent 85% of beginner sharpening failures.
How Often Should You Sharpen Your Pocket Knife?
Sharpening frequency depends on your steel type and how hard you use the knife. Budget steels need attention weekly for daily EDC use. Premium steels stretch that to 3-4 weeks.
According to URBAN EDC, "CATRA testing shows that M390 retains its edge up to 30% longer than S35VN." That translates to real-world differences in how often you're pulling out the stones.
For daily EDC use (opening packages, cutting cordage, general tasks):
- Budget steels (420HC, 8Cr13MoV): Sharpen every 7-10 days
- Mid-range steels (AUS-8, 14C28N): Sharpen every 2-3 weeks
- Premium steels (S30V, VG-10, M390): Sharpen every 3-4 weeks
For occasional use (weekend camping, light tasks):
- Budget steels: Every 2-3 months
- Mid-range steels: Every 4-6 months
- Premium steels: Every 6-12 months
Block Sharpener notes: "For kitchen knives, every few months is usually enough." Pocket knives see harder use than kitchen knives typically, so expect more frequent maintenance.
Signs your blade needs sharpening:
- Light reflection test: A sharp edge reflects almost no light because the apex is thin. If you see light glinting off the edge under direct light, those spots are dull and rounded.
- Paper test: Hold printer paper vertically and try to slice it. A sharp edge cuts cleanly without tearing or requiring forward pushing motion. If the paper pushes away or tears, you need sharpening.
- Thumbnail test: Very lightly drag the edge across your thumbnail perpendicular to the nail. A sharp edge will slightly catch without cutting. A dull edge slides smoothly. Use very light pressure – this isn't about cutting yourself.
- Performance decline: If you're applying more pressure than usual to make cuts, that's your clearest signal. As URBAN EDC points out, "When a knife is dull, we usually find ourselves overcompensating with increased pressure, which can actually be quite dangerous."
Maintenance timeline – hone versus sharpen:
Week 1-3: Hone with ceramic rod (5-10 passes per side) Week 4: Full sharpening session (1000→3000→6000 grit) Repeat
This assumes daily EDC use with mid-range steel. Adjust based on your actual cutting tasks and steel quality. If you're processing cardboard daily, sharpen more often. If your knife mostly opens letters, stretch the timeline.
Key Takeaway: Daily EDC users with budget steels (420HC, 8Cr13MoV) need weekly honing and monthly sharpening. Premium steels (S30V, M390) extend maintenance intervals 3-4x. Test with paper slicing rather than guessing by calendar.
Frequently Asked Questions
Can you sharpen a pocket knife with a coffee mug?
Direct Answer: Yes, the unglazed ceramic ring on a coffee mug bottom works as emergency sharpening, equivalent to roughly 600-800 grit.
It won't repair damage or establish a new bevel, but it can revive a slightly dull edge temporarily. Use the same angle as regular sharpening and draw the blade across the ceramic ring. Results are inconsistent depending on the ceramic composition, and you risk scratching your blade if the mug has glazing defects. It's an emergency technique only – not a replacement for proper stones.
What grit whetstone is best for pocket knives?
Direct Answer: A 1000/6000 grit combination stone handles 90% of pocket knife sharpening needs for $18-25.
William Henry explains: "You can find course stones less than 1000 grit up to finishing stones at 8000 grit grades." For routine maintenance, start at 1000 grit. For damaged blades with chips, start at 400 grit. Finish at 6000 grit for a polished edge. Going beyond 6000 to 8000+ grit provides minimal practical benefit for EDC pocket knives – save the ultra-fine stones for razors and specialty blades.
How do you know when a pocket knife is sharp enough?
Direct Answer: A properly sharpened pocket knife slices vertically-held printer paper cleanly without tearing or requiring forward pushing motion.
The paper test is objective and reproducible. Hold the paper in one hand, slice with just the blade's weight – no sawing motion. If it cuts cleanly, you're done. Other tests: the edge should reflect almost no light when viewed under direct illumination, and it should slightly catch (not cut) when dragged very lightly across your thumbnail perpendicular to the nail. For EDC tasks, you don't need arm-hair-shaving sharp – that level of refinement reduces edge durability for utility work.
Is 15 or 20 degrees better for pocket knife sharpening?
Direct Answer: 20 degrees per side provides the best balance of sharpness and durability for most pocket knife users.
Popular Mechanics confirms: "sharpen everything at 20 degrees. Your average person will not notice a difference between 20 and 15 degrees." Choose 15-17 degrees only if you need maximum sharpness for detail work and you're willing to sharpen more frequently. Choose 22-25 degrees for heavy-duty use where edge durability matters more than keenness. For general EDC (opening boxes, cutting cordage, food prep), stick with 20 degrees.
Can you ruin a pocket knife by sharpening it wrong?
Direct Answer: Yes – inconsistent angles create weak spots that chip easily, and over-sharpening thins the apex until it fails under normal use.
The most common permanent damage comes from using pull-through sharpeners incorrectly, which can create severely uneven bevels requiring professional regrinding ($15-35). Excessive pressure during sharpening can also overheat the edge and affect temper, though this is rare with manual stones. Minor mistakes like slight angle variation just mean you'll need to sharpen again sooner – not permanent damage. Follow the Sharpie trick to verify your angle and stop each grit level as soon as you feel a burr to avoid over-thinning.
How long does it take to sharpen a pocket knife?
Direct Answer: Expect 15-25 minutes for a complete sharpening session (1000→3000→6000 grit plus stropping) once you've learned the technique.
First-time attempts often take 45-60 minutes as you learn burr detection and angle consistency. A 3-inch blade is typical. Longer blades add 5-10 minutes. If you're repairing damage starting at 400 grit, add another 10-15 minutes. Touch-ups on barely-dull blades take 5-10 minutes at a single grit level. Buck Knives notes that "It should take at most 5-8 strokes to resharpen if your angle was correct" for light maintenance.
Do you sharpen both sides of a pocket knife equally?
Direct Answer: Yes – alternate sides every 5-10 strokes to maintain symmetrical bevel geometry and prevent oversized burr formation.
Wicked Edge recommends: "Do about 15 alternating, edge-leading passes per grit." Some experienced sharpeners work one side completely then the other (single-side method), but this requires skill to control burr size. For beginners, alternating frequently is more forgiving and produces consistent results. Count your strokes carefully – if you do 10 on the right, do exactly 10 on the left. Uneven work creates bevels of different widths that compromise edge performance.
Should you oil a pocket knife after sharpening?
Direct Answer: Yes – wash the blade with soap and water to remove metal particles, dry completely, then apply a thin coat of mineral oil or knife-specific oil to prevent corrosion.
This is especially important for carbon steel and non-stainless knives. Stainless steel can go unoiled but a thin film doesn't hurt and provides extra corrosion protection. Use food-grade mineral oil (inexpensive and safe) or products like Tuf-Glide. Avoid vegetable oils which go rancid. 3-in-1 oil also works. Wipe off excess – you only need a thin film. The oil prevents rust and keeps the pivot mechanism smooth on folding knives.
Ready to Get Started?
For personalized guidance, visit Knife Depot to learn how we can help.
Conclusion
Sharpening your pocket knife at home isn't complicated once you understand the fundamentals: consistent angles, proper grit progression, and recognizing when you've formed a burr. A $25 combination stone handles most needs perfectly well – expensive equipment won't compensate for poor technique, and good technique produces excellent results on budget stones.
Start with 20 degrees per side unless you have specific reasons to go steeper or shallower. Progress from 1000 to 6000 grit, stopping each level when you feel that burr. Strop if you want that extra refinement. The entire process takes 15-25 minutes once you've practiced a few times.
Your knife will thank you with cleaner cuts, safer operation, and longer edge retention between sharpenings. And you'll save the $10-15 per sharpening that professional services charge. Whether you're carrying a budget 8Cr13MoV folder or a premium S30V blade from Knife Depot, proper maintenance keeps it performing at its best.


Leave a Reply