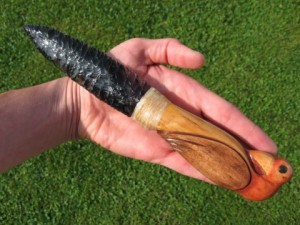
 If you’re serious about knives, then there’s no doubt you’ve looked into how knives are made and have maybe even yearned to make your own.
About a month ago, I wrote a post on how to make your own knife out of a file. While making a knife that way is definitely legitimate, it requires some less common tools and machinery, which you would never find in the wilderness.
There’s actually a much simpler way to make a cool looking knife by flintknapping, which can also come in handy during survival situations.
For anyone not familiar with knapping, it dates back to prehistoric times and is often done with flint, obsidian, chert or other specific stones. Basically what you do is take something like copper cylinders, hammer away material and flake off the ends to make it sharp. Then affix a handle and you’re finished.
It actually only takes a few materials and tools to make a great looking knife that’s extremely sharp and functional.
If you’re good at flintknapping, you can also make some money. In a recent article in the Newark Advocate, writer Dick Martin said he knows a guy who sells his work at arts and crafts shows for $10 an inch.
So, if you’re interested in making your own knife whether for money or sale, here are some basic instructions on how to go about doing it.
1. Get the materials
Even though you can do knapping with a range of materials, flint is probably the easiest because it is the most accessible and was commonly used by Native Americans. It’s possible to find flint out in the wild, but it might be difficult in some areas. You can buy small chunks of flint over the Internet or at shops. Other tools you will need include copper cylinders, a screwdriver and protective gear for your hands and eyes. Some people also have flintknapping kits that come with all the materials you’ll need. Of course, if you’re out in the wild you will have to make do with stones.
2. Strike the flint or stone to create flakes
Once you have the thick pieces of stone or flint, you need to cut off workable pieces of blade by striking it. The video below demonstrates how to cut off nice pieces (it also demonstrates why you should wear protective gear). While this can sometimes be inexact, you want to ideally take off pieces the size of a knife blade.
3. Use a screwdriver or point for fine flaking
For this step, many true outdoorsmen have used the point of antlers or horns, but beginners should stick to traditional tools like a screwdriver. It takes some practice, but the idea is to gently flake off the sides of the flint, so you can sharpen the edges. For more detailed instructions on how to do this, check out this site.
4. Add a handle
After you’ve completed the finishing touches on the sharp flint blade, put on a handle. There are a couple ways to do this. If you’re great a working with wood, you can attach a wooden handle to the end by affixing it with sturdy tape or wire. Another way is to wrap the entire bottom half with tape and cord as a makeshift handle. For this final step, check around the Internet for different ideas and how to execute them.


April 5, 2011 at 1:14 am
Great post thank you . 🙂
April 5, 2011 at 1:31 am
nice, thx
April 5, 2011 at 4:16 am
I made one out of wood and pounded rough granules of granite into it. I was surprised it worked! Weird looking though..
July 11, 2021 at 10:15 pm
What a great post. Loved it